
General FAQ on the JusProg parental control programmes
Using JusProg for Windows
As a parent, you want to surf without any restrictions. To do this, you can quickly switch off the JusProg filter temporarily without having to uninstall the software.
For security reasons, this function is protected with the parent password. If you have forgotten the parent password, first set up a new parent password using the security question. Already during the installation of the software, they are offered to set up the parent question.
Proceed as follows:
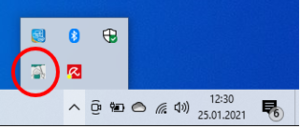
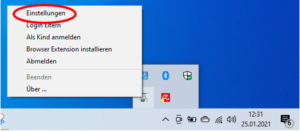
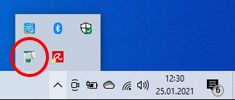
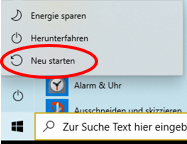
Click on the JusProg icon with the right (!) mouse button, usually at the bottom right of your computer monitor, next to the clock. You may first have to click on an arrow pointing upwards to see the icon.
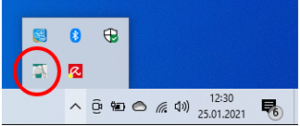
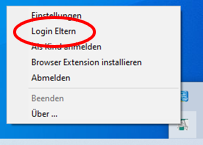
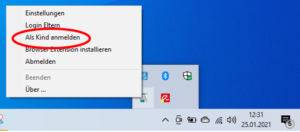
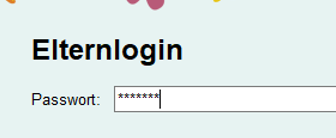
A small menu opens. There you click with the left mouse button on the item “Login Eltern”.
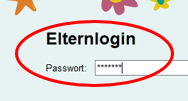
A larger window opens. Enter your parent password here and you can surf without restrictions as a parent.
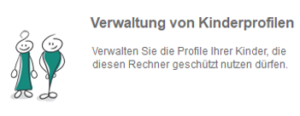
User profiles
To create child accounts (profiles) in JusProgNET 9.x, first call up the parent area (“Einstellungen”). You can find out how to do this in this FAQ in the “Einstellung der Software” block.
In the “Einstellungen” select the section “Verwaltung von Kinderprofilen”

You see the first child profile that you created in the course of the “Quick Setup” during installation. This first child profile does not yet have a password (strictly speaking: an empty password). Since the Windows computer will be used by several children in the future, you should also give a password to the first child profile created.
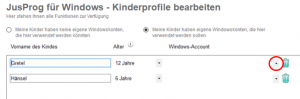
Then click at the bottom left on “Neues Profil anlegen”.
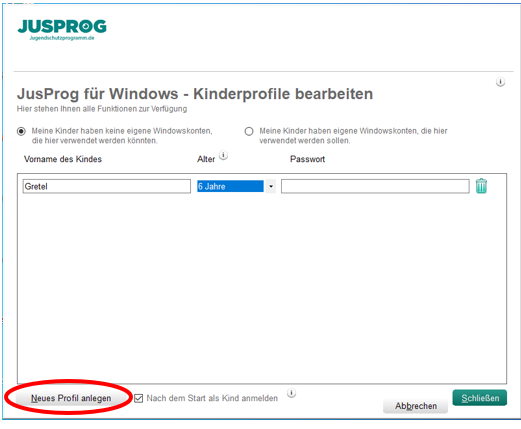
A new entry appears in the list of child accounts. Give the new child account a name, preferably the child’s name.
From the pull-down menu, select the age level that best suits your child’s development and your protection needs. The actual age of the child does not have to correspond to the age level.
Then assign a password. The child logs in later with this password. The password should be simple enough for your child to remember and type in – it does not have to meet the usual stringent security requirements for passwords, since no one can access the software from the outside anyway. A password along the lines of “cat” is perfectly adequate; it must be at least three characters long.

At the bottom of the screen, you can specify whether the youngest child should be logged in automatically when the computer is restarted. This saves entering the password and is especially useful if the computer is mainly used by one child.
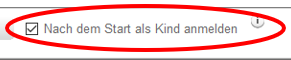
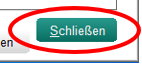
… in the end with “Schließen” Save and confirm.
Later, when a child wants to log into their profile, they right-click on the JusProg tray icon at the bottom right of the desktop monitor, next to the clock (possibly hidden under an arrow).
…and then in the menu that opens click on “Als Kind anmelden”
Set up a Windows user account for you and your children. Microsoft shows how to do this with Windows 10 in this guide:
Tip: In the course of setting up Windows user accounts, Microsoft tries to “foist” on you a separate Microsoft account (registration) for each user. If you do not want to do this and are careful when setting up, you can also set up Windows user accounts without a Microsoft registration.
Go to the Parent Settings in the JusProg Menu, to the item „Verwaltung von Kinderprofilen”.
There you will find the item „Meine Kinder haben eigene Windowskonten, die hier verwendet werden sollen.” at the top right. Click on this.
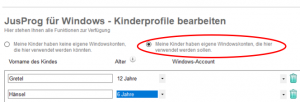
You can then use the small arrow pointing downwards to assign the respective Windows accounts to the corresponding child.
Browser extensions
The easiest way to install a browser extension is to use the configuration wizard of the JusProg software. When installing the software for the first time, you will be asked whether you want to install the extension. Leave the prepared tick and click on „Weiter“.
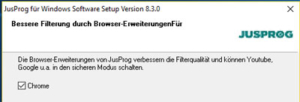
If the JusProg software is already installed (from version 3.8.0), then it is best to start the “Assistant” from the parent area again and click through the pages until you reach the page with the query for the browser extension and check the box. Start the “Assistant” by clicking on „Assistent starten“ in the password-protected parent area.

The next time you start the Chrome browser, a page from the Chrome Webshop will be opened automatically, where you can install the browser extension with just a few clicks. You may have to wait a minute or more for the page to be displayed – please be patient.
You can also access the browser extension directly in the Chrome webshop:
https://chrome.google.com/webstore/detail/jusprog-browser-extension/cofnbighjemcpjocblhdfppnaceknipe?hl=de
Attention: You must open the link in the Chrome browser, not in another browser such as Firefox.
Note: If you install the Chrome Extension directly from the Chrome Web Shop, you must also activate the use of the extension in the JusProg software (e.g. with the “Assistant”, see above). Without activating the function in the JusProg software, the interaction between extension and software will not work properly.
Further information
The JusProg software currently only offers German as a language. In future versions, other languages will be integrated and then accessible via the language switch at the menu item “General Settings”.
With the parent password, you as a parent can make settings in the JusProg software and also switch off or uninstall the filter – so your child should not have any knowledge of the parent password!
If you suspect that the child might have guessed the password or found a piece of paper on which it is written, please change the parent password.
To access the settings, rightclick on the JusProg icon at the bottom right of your computer monitor, next to the clock. You may have to click on an arrow pointing upwards to see the icon.
A small menu opens. There you leftclick on the item „Einstellungen“.
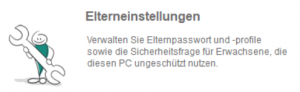
Then (with the previous parent password) first call up the item „Elterneinstellungen“ in the JusProg menu.
Now you can enter your newly chosen password on the left-hand side and confirm it on the right-hand side.

Clicking on „Speichern” at the bottom right completes the process.
The security question is your only chance to recover a forgotten parent password. Because the parent password is only stored (encrypted) on your computer, JusProg does not know the password either.
If you suspect that your child could guess the security question and get hold of the parental password, it is better to change the question and answer.
This is how you proceed:
First call up the “Elterneinstellungen”(you can find out how to do this under: „Einstellungen der Software” under the sub-item „Einstellungen im Elternbereich aufrufen”)
There you can either choose one of the ready-made security questions or create your own.
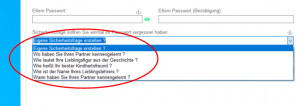
In the item below, enter a suitable answer to your question and then click on „Speichern”.
Tip: Choose a question to which you are sure you know the answer in clear writing, but your child does not. The answer should consist of one or at most two words. Later, when answering the question, you will have to enter the answer exactly, including the correct capitalisation and the correct number of spaces.
Limit surfing times
You can limit the times when your child is allowed to use the Internet in the JusProg software for Windows. You can specify:
- During which time your child is allowed to use the internet
- How much time in total he or she is allowed to spend on the Internet within this time frame.
The settings can either be made the same for all weekdays or individually per weekday. Of course, if you have several child profiles, you can make different settings for each child.
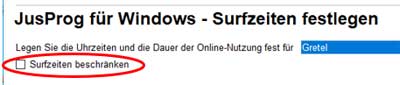
To set up the surfing times, go to the parent settings (info on this in this FAQ) and select the “Zeiträume festlegen” button.

If there are several child accounts, select for which child you want to make time control settings.

Then activate the time control by ticking “Surfzeiten beschränken”
You can now choose whether you want to make the same settings for all days of the week or different settings for each day of the week separately (e.g. on weekdays there is no surfing after 7 p.m., but on weekends the Internet will be there till 9 p.m.). To switch, click on “für alle Tage”

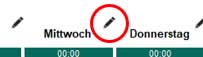
… then the display changes and all weekdays are shown:

You can easily change the surfing times by clicking on the period you want to change. If the colour is green, surfing is allowed during the time, if it is red, surfing is prevented.

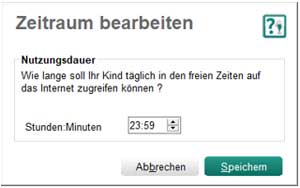
If you have determined the times when your child is generally allowed to use the Internet, you can additionally determine how much time he or she is allowed to spend on the Internet in total during this “green” period. Example: Your child is allowed to surf the Internet from 2 p.m. to 6 p.m., but only for a total of 45 minutes that day. To set the surfing quota, click on the pencil symbol next to the day of the week for which you want to make the setting:
… and enter how much time your child may spend on the Internet that day. You can enter the hours and minutes directly or select them with the arrow keys. As long as you do not change anything, the surfing quota is unlimited.
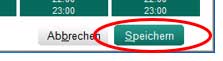
At the end, save your entries by clicking on “Speichern”.
Deinstallation
This is how you can uninstall the JusProgNET software from version 9.x on Windows 10:
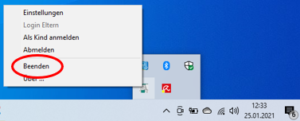
First you have to quit the software in parent mode. To do this, right-click on the JusProg tray icon. You will find this on the computer desktop at the bottom right, next to the clock. Sometimes the icon is hidden under an arrow.
Select the “Login Eltern” with the left mouse
Enter the parent password. If you have forgotten the parent password, use the “Passwort vergessen”function. The password is necessary so that children cannot uninstall the software without authorisation.
Eine Meldung unten rechts auf dem Monitor zeigt Ihnen an, dass Sie jetzt im Eltern-Modus sind.

Call up the tray menu of the JusProgNET software again and click on “Beenden”.
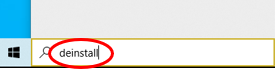
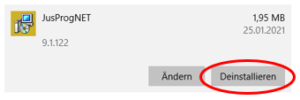
The JusProg software is now finished and can be uninstalled in Windows 10. This is done in the usual way for Windows. The easiest way is to enter the word part “deinstall” in the Windows input field at the bottom left of the desktop.
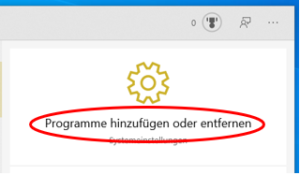
In the large layer that opens, click on “Programme hinzufügen oder entfernen” (in the control panel).
A large “Apps & Features” window opens, in which you scroll down to the letter “J” and look for the JusProgNET software.
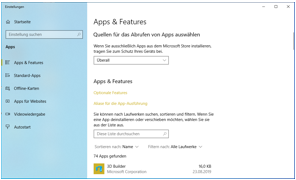
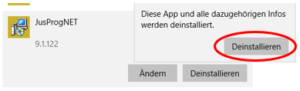
Click on “Deinstallieren”next to the “JusProgNET” entry…
… and confirm again with “Uninstall”.
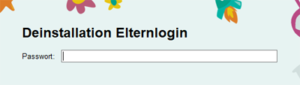
For security, enter the parent password. If you have forgotten your parent password, cancel the uninstallation and first create a new parent password using the security question (via the JusProg icon at the bottom right of the monitor, then select “Eltern Login” and “Passwort vergessen”).
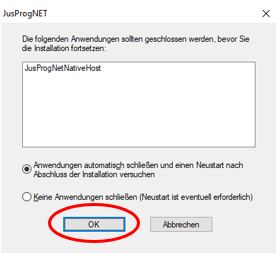
If the question appears whether the “JusProgNetNativHost” should be closed, please answer with “OK”.
… and watch the software being uninstalled …
… but ATTENTION, after a while (not in all cases, it depends on the Windows installation) a new icon appears at the bottom of the screen icon bar of your monitor, on which you click with the right mouse buttonv

… to then watch the further uninstallation again …
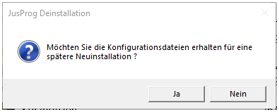
Now you will be asked whether you want to keep the configuration files for a possible later reinstallation. The configuration files contain, for example, the user accounts of your children with the password, entries in the white and black lists and other settings. Click “Ja”, if you want to keep the files or “Nein”,if JusProgNET is to be uninstalled as residue-free as possible.
… the uninstallation is now complete. To be on the safe side, restart the computer. Only then are all software parts really removed.
Please DO NOT try to somehow “uninstall” the JusProg software by clicking through computer folders and deleting what appears to belong to JusProg. The result will usually be that browsing will be completely blocked! This is a good thing, because otherwise the kids could also bypass the software simply by deleting it.
The JusProg software consists of several parts that reach into the deepest depths of the operating system and some of which cannot be easily deleted even if you were to track them down.
So if you want to uninstall JusProg, please follow our instructions here in the FAQ.
What to do if you (or your child) have already deleted parts? Then install the JusProg software (in the same version as before!) again on the computer, temporarily deactivating your virus protection programme. This way the installation will be complete again with all parts and you can then uninstall in the normal way.
If you get the message “Please log off all child accounts” during uninstallation, you have probably installed JusProgNET with Windows user accounts. JusProgNET cannot be uninstalled in a parent account if it is still active in Windows child accounts at the same time.
Therefore, log off all Windows child accounts from Windows. It is best to restart the computer and log in only with the parent Windows user account.
You can uninstall the JusProg software practically without leaving any residue. In the process, all settings and also the entries on the white and black lists are lost.
The uninstallation is password-protected for security reasons. You need the parent password for this. If you have forgotten the parent password, please first set up a new parent password with the help of the security question. You can find out how to do this here.
Information for the outdated software (up to version 6.x):
This is how you proceed with the uninstallation:
The screenshots show the uninstallation for the Windows 7 operating system, but for Vista and XP you proceed in a very similar way.
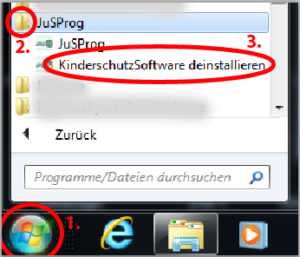
Click on the Windows symbol at the bottom left. You may then have to click on “All programmes” in the menu that opens to get a list of all programmes installed on the computer. Find “JusProg” in the list and click on the folder symbol (if JusProg appears more than once, look for the version with the folder symbol to the left of the JusProg lettering). Then click on “Uninstall Child Protection Software”:
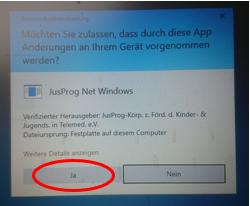
You may receive a security window from Windows (“Do you want to allow …”). Confirm this window by clicking on “Yes”.
Next you will see the following window, which you confirm with “Next”:
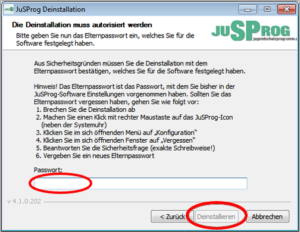
Now you have to enter the parent password for security reasons – because the JusProg software is protected against uninstallation by your child. If you have forgotten the parental password, follow the instructions on the screen or in this FAQ (Info)
Installation of the software
Windows sometimes only allows the installation of software programmes (Microsoft calls them “apps”) that are downloaded from its own Windows Store. Whether this is actually for security reasons or rather for Microsoft’s business policy remains to be seen.
In any case, you can change this setting very easily and “Allow apps from any source”.
To do this, go to the “System Settings” of Windows 10, select the “Apps” section and then “Apps & Features” and change the pull-down to “Allow apps from any source”.
You can get step-by-step instructions here: https://www.tecchannel.de/a/ausschliesslich-app-installation-aus-dem-windows-store-zulassen,3277891. Note: Tecchannel offers you the article as a pdf for purchase, but you can get all the necessary information for free by clicking on the arrow on the right of the slider image and thus following the step-by-step instructions.
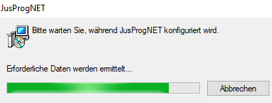
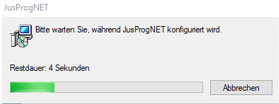
After double-clicking on the software downloaded to your hard disk, the installation of JusProgNET starts.
You will be reminded once again that
- you should close all other programmes on the computer to avoid data loss, because the computer is restarted in the course of the installation.
- you should temporarily disable your anti-virus software for installation so that your anti-virus protection does not potentially block the installation of parts of JusProg.
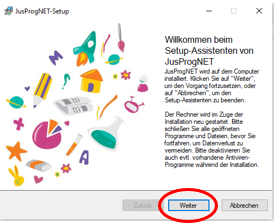
Then click on “Weiter” …
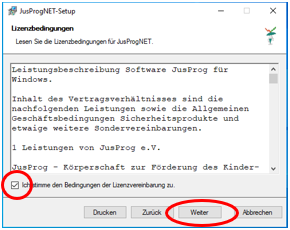
… and read and then confirm the licence conditions …
… and the privacy policy …
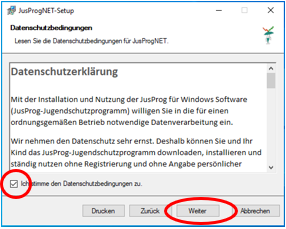
It is not possible to install JusProgNET without confirming the licence conditions and privacy policy. If you do not agree, end the installation by clicking on “Abbrechen”.
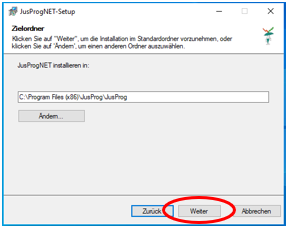
You will then be asked in which folder the JusProgNET software should be installed on your Windows computer. It is best to stay with the suggested location and click on “Weiter”. (Note: this step is omitted from version 9.2.133)
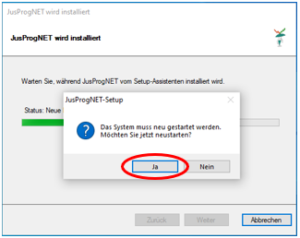
You will now be asked to restart the computer. Since you have already closed all other open programmes at the beginning of the installation, confirm this request by clicking on “OK” and wait for the restart.
After restarting the computer, you will be greeted by a JusProg screen.

… and after clicking on “Weiter” you will receive confirmation that the software is now installed…
… now the first setup of JusProgNET can start. For this purpose, there is a so-called “quick start” where you can quickly and easily carry out all the steps necessary for the initial setup.
The “quick start” is described in the following FAQ article.
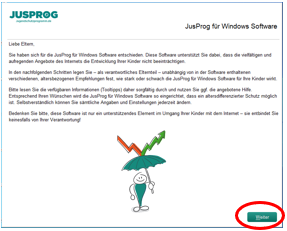
After you have installed the software on your Windows 10 computer (see the FAQ post above), you can use a “quick start” to quickly and easily make all the settings necessary for the first start. You will then automatically have good protection for a child that suits the selected age level.
The quick start concentrates all the basic settings on this screen:
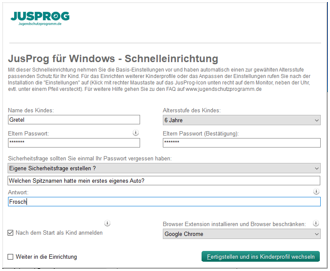
First enter the name of your child. If you have several children (of different ages) who are allowed to surf on the same computer, start with the youngest child. In the settings, you can later create additional child accounts with specific age levels and settings.
Choose the age level that best suits your child and their stage of development. It does not have to be the age level that corresponds to his or her real age. When you select the age level, all settings for suitable protection are already made (based on the JusProg experience), but you can adjust these later in the “Settings” according to your wishes.
![]()
Then enter a password for your parent account. You need this password to be able to make settings later, to surf without restrictions and to uninstall the software if necessary. Choose a password that you can remember (do not write it down on the computer, your child could look it up!), but that your child cannot guess. The password must be at least three characters long. We deliberately do not ask for complicated passwords, because you should not have to write down the password you have chosen yourself anywhere and only your child can be the “hacker”.
![]()
If you ever forget your parent password, you can recover it by answering the Forgotten Password question correctly. ATTENTION: Your password is not stored centrally anywhere, the correct answer to the forgotten password question is the only way to recover your password. So be very careful when entering it.
Tip: Your child should not be able to guess the answer to the forgotten password question. Therefore, it is best to choose your own question and enter it in the field that then appears.
Important: If you have to give the answer to your security question later, it is important that it is written exactly with lower and upper case letters and spaces. Therefore, if possible, choose an answer in one word, never in a longer text.

In Quick Start, you can specify whether the child profile (the profile of the youngest child if there are several children) should start automatically when the computer is restarted. This allows surfing directly after restarting (in the age level of the youngest child) without entering a password. Of course, you can log in another child at any time or switch off the filter with the parent login.
![]()
What should happen after completing the “quick start”? Usually the child profile is then called up (and a browser extension is installed if necessary), but you can also jump to the parent settings first, e.g. to create further child profiles or change settings.
![]()
Should a browser extension also be installed with the JusProgDNS installation? This is highly recommended, because the browser extension offers additional protection for your child and therefore allows e.g. the use of Youtube and Google already at the age of 6, but in SafeMode (content filter of the provider).

To protect against circumvention, after installing the extension, you can only surf the Internet with the selected browser. The installation of the extension starts after the installation with the first call of the selected browser. Then follow the displayed installation steps.
Finally, click on the green button…
![]()
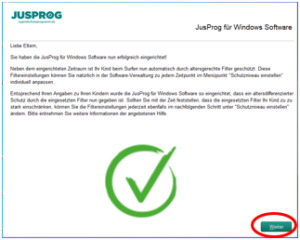
… and have set up the software to such an extent (apart from a browser extension that may still need to be installed) that your child can surf with it in a protected manner. This is shown to you with a confirmation screen.
Software settings
The JusProg software has an administration area where parents (after entering the parents’ password) can make settings. Here, among many other settings, e.g. the age level of the child can be selected or additional websites can be defined that are to be displayed or blocked for the children. Furthermore, additional profiles can be created for other children, especially if they belong to a different age group.
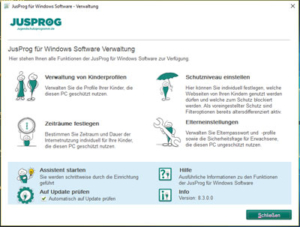
This is how the parent area (“Settings”) is called up in JusProgNET from version 9.x:
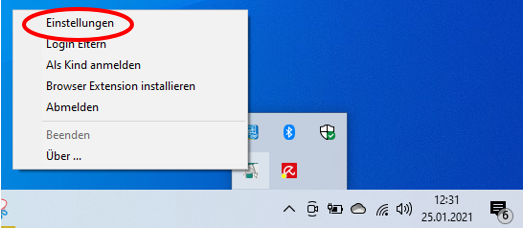
Right-click on the JusProg tray icon located on the bottom left of the desktop monitor, next to the clock. The icon may be hidden under an arrow.

Clicking opens the so-called tray menu of JusProgNET. Click here on”Einstellungen”.
A large window opens where you enter your parent password. You assigned yourself the parent password when you installed the JusProg software for Windows. If you have forgotten the password, use the “Passwort vergessen”function, which you will find on the same screen.
… and you are already at the parent settings:
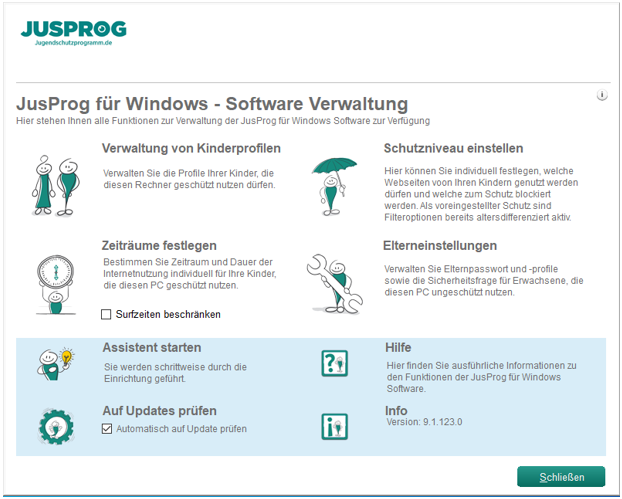
The JusProg software has an administration area where parents (after entering the parents’ password) can make settings. Here, among many other settings, e.g. the age level of the child can be selected or additional websites can be specified that are to be displayed or blocked for the children.
There are several ways in which you can access the configuration of the JusProg software to make settings yourself. You can call up the JusProg software with the icon on the Windows desktop (if you allowed this during installation) or, like all other software programmes, with the “Start” button at the bottom left of the screen.
To access the JusProg settings with the tray icon:
The parent administration area can be accessed by first left-clicking on the arrow in the bar at the bottom of the screen (next to the clock etc.) (if the JusProg icon is not already displayed in the bar) and then right-clicking on the small JusProg icon in the selection.
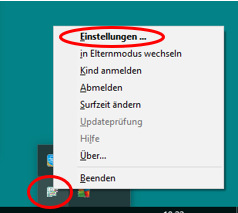
Please select the item „Konfiguration“ in the JusProg menu that opens.
You will now be asked for the parent password in a new window (if this is not visible, have a look “behind” the already open windows of other programmes):
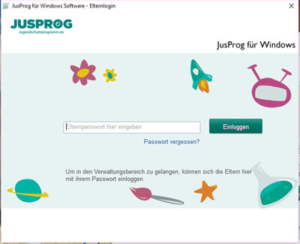 You have chosen the “parent password” yourself in the course of installing the JusProg software. It is important that you observe upper/lower case and also enter the password exactly correctly. The password is displayed in dots, so your child can look over your shoulder when you enter it (shield the keyboard if necessary) without being able to read the password. After entering the password, click on „Einloggen“ … and the window of the parents area opens.
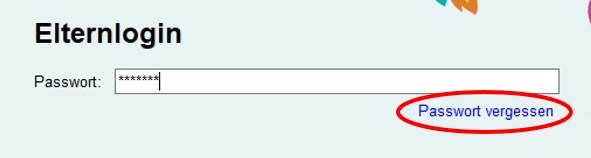
If you have forgotten the parent password, first call up the input window for the parent area. To do this, right-click on the JusProg icon at the bottom right of the screen.
Then click on „Einstellungen“ in the menu that opens.
Then you will see the login page for the parents’ area. Here there is a link „Passwort vergessen?“, which you click on.
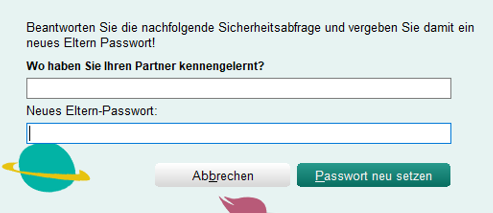
Now a screen opens in which you can enter the answer to your forgotten password question and set a new password if the answer is correct. You entered the answer to the forgotten password question yourself when you installed the JusProg software. The answer must be entered exactly as it was before, please also note upper and lower case and spaces. When entering the answer during the installation, we had recommended that you enter the answer in one word.
You have forgotten both your parent password and the answer to the forgotten password question?
That’s bad, because for data protection reasons we do not store passwords centrally, but only on your computer. So we don’t know your password and can’t recover it or email it to you.
Please try different types and spellings to see if you remember the password or at least the correct answer to your forgotten password question – after all, you chose both yourself!
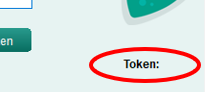
…and if nothing works anymore, you can contact our support by e-mail. The password restore via our support is tedious and should be avoided if possible. You will then need the token information, which you will find on the same screen as the forgotten password question.
If you have forgotten the parent password, first call up the input window for the parent area. To do this, right-click on the JusProg icon at the bottom right of the screen.
Then click on „Einstellungen“ in the menu that opens. You will then see the login page for the parents’ area. Here there is a link „Passwort vergessen?“, which you click on.
The JusProg system supports parents in guiding their children into the world of the internet. Therefore, parents have the final decision as to which websites are displayed for their children and which are blocked – no matter what the age labels of the providers on the websites and what the JusProg filter lists or the fragFINN search engine whitelist say about it. Only the websites that are absolutely forbidden in Germany (BPjM list, e.g. child pornography) cannot be unblocked even by parents.
Parents can set websites (domains) in the software to a personal whitelist (then the website is displayed) or a personal blacklist (then the website is blocked).
First call up the password-protected parents’ area. You can find out how to do this here.
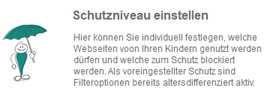
Then click on the „Schutzniveau einstellen“area.
![]()
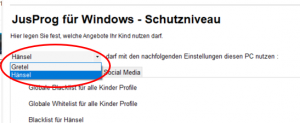
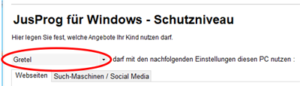
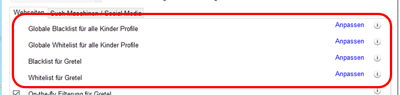
In the „Schutzniveau einstellen“ area, select the name of the child for whom you want to edit the parent lists at the top. If there are several child profiles, the name can be changed by clicking on the arrow to the right of the name. The tab „Webseiten“ must be selected.
You then have the choice: Do you want to make entries only for a specific child or for all child profiles at the same time?
If the entries should only apply to one child, click on „Whitelist für (Name)“ or „Blacklist für (Name)“.
![]()
If you want the entries to apply to all child profiles, click on „Globale Whitelist für alle Kinder Profile“ or „Globale Blacklist für alle Kinder Profile“.

It is best to enter the domains of websites with a leading * asterisk and a full stop. Example:
*.example.com
The asterisk also includes so-called subdomains, because many websites use these, for example, to include pictures on the page (e.g. pics.example.com).
Set protection level (from 9.x)
To set the level of protection for your child, go to “Eltern Einstellungen” (see this FAQ for more information) and select the “Schutzniveau einstellen” section.
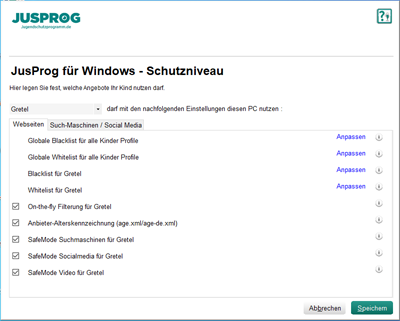
Here you can then specifically share or block websites for your children, make settings for social media and search engines and make other configurations.
If there are several child profiles, select the child for whom you want to make settings from the pulldown.
As a parent, you can decide which websites your child is allowed to visit and which are not. Your decision has the highest importance and “overrides” all other age classifications of the JusProg system, i.e. it has a higher priority than the provider identification (age.xml / age-de.xml) and the JusProg filter list. Only websites that are banned in Germany (usually according to the BPjM) cannot be released, but you will not want to do that anyway.
In the “Schutzniveau einstellen” section, you can block websites, then put the domains on the “Blacklist”, or unblock them, then put the domains on the “Whitelist”.
If you have more than one child, you can unblock / block websites with one entry for all children or also make this setting specifically for the child that you have selected in the pull-down at the top of the screen.
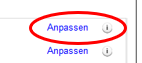
So select the appropriate line and then click on “Anpassen” in the line on the right:
An input window opened. The window is the same in principle for all versions (unblock / block for all / one child). We will show you the input using the example “Blockieren für alle Kinder” (global blacklist). To enter a domain additionally, click on “Hinzu”:
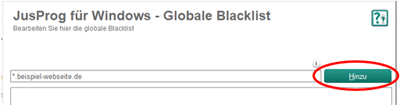
Then enter the domain you want to add to the whitelist or blacklist in the input window.
Tip: We recommend that you release or block a domain “including subdomains”. Then your entry will also cover content that may not be visible to you on the website with the same domain, e.g. “bilder.example.com”.
If you want to record a domain with all subdomains, then put an * asterisk and a . dot in front of it, e.g. “*.example.com” (without inverted commas).
Always leave out a leading www. This is added by the system, both for “inc. Subdomains” as well as when restricted to only one specific domain. So do not enter “www.example.com”, but “*.example.com” or “example.com”.
Of course, you can also enter only one specific subdomain if, for example, a website offers different content under different subdomains.

When you have made all the entries, click on “Speichern”.
![]()
If you later want to unblock / block a website (domain) only temporarily, you can remove the tick and save it. Then you do not have to re-enter the domain later, but only need to check the box again to activate it and save it.
If you want to delete an entry, click on “löschen”.
You can conveniently define for some large portals whether they should be displayed or blocked for the selected child profile. The JusProgNET software then makes all the necessary settings for domains and subdomains in the background.
The default setting of what is allowed or blocked by default depends on the selected age level. You can of course change this default setting at any time.
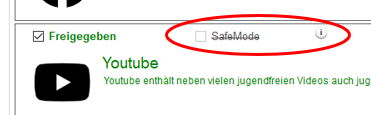
To do this, call up the tab”Suchmaschinen / Social Media” in the “Schutzniveau” area. If you tick a portal, a green “Freigeben” is displayed and the portal is accessible for the child, without a tick a red “Blockiert” appears and the portal cannot be accessed.
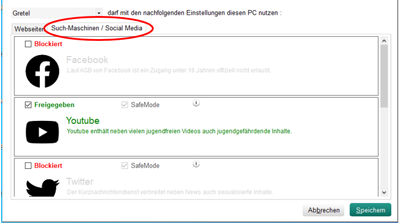
Some large portals have a so-called “safe mode”. If this is activated, the portal provider filters the content. By default, SafeMode is active on all portals listed here if there is a SafeMode.
You can make changes according to subject areas. To do this, go back to the “Webseiten” tab and uncheck the desired subject area, i.e. search engines (e.g. Google, Bing), social media (e.g. Instagram and Facebook) or video (e.g. YouTube).
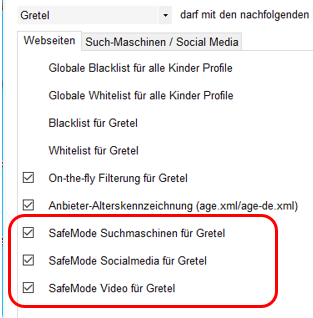
On the large portals, you will then see that the SafeMode is greyed out and crossed out when it is no longer active:
Problem solving
With the Windows update “h20h2” (rolled out since February 2021), Microsoft unfortunately made a programming error in the filter functionality (on which JusProg is based in the Windows software) of the operating system, so that in many cases the internet connection is completely cut off. Unfortunately, we have no influence on this error and cannot provide a technical workaround.
In the meantime, Microsoft has released a patch (update module) for this, which is automatically installed if you have activated the automatic updates in the Windows operating system. As soon as this update is installed, the JusProg Windows software works as it should again.
Unfortunately, Microsoft does not always install the h20h2 update and the bug-fixing patch at the same time during the update, so it is possible that your child’s computer already has the h20h2 update (Internet is blocked), but the patch cannot be reloaded because of the blocking, or that the automatic installation by Microsoft does not take place until days later. In this case, the most reliable way is to uninstall the JusProg software, perform all updates and patches manually and only when this has been done, reinstall the JusProg software. We know this is not the best way, but we are powerless against Microsoft’s programming errors.
Alternatively, you can use our Windows software for JusProgDNS, which is not affected by Microsoft’s error:
Please read the above information on
“Problems due to Windows update (h20h2)”
Some websites are virtually assembled from different sources (domains). In order to increase the security against circumvention, the JusProg software checks not only the main address (domain) that you see at the top of the input line of your Internet browser (Internet Explorer, Firefox, etc.), but also all hidden sources.
However, this has the consequence that websites are sometimes not displayed correctly or completely, even if you have set the main domain from the browser line to the whitelist and thus released it.
Unfortunately, there is no patent remedy for the solution, because the “supplier domains”, we also call them “function domains”, are hidden in the programming (source code) and are not easy for a technical layman to recognise. If you want to try it anyway (you can’t break anything in the process), right-click on a free area of the website and select “Show source code” from the menu this calls up. Don’t be confused by the incomprehensible lines and pick out all the domain names contained in the gibberish and whitelist them individually in addition to the main domain. If you search for https (key combination: Ctrl and F), it is easier to find the main domains contained.
Tip: In many (but not all) cases it is easier:
- Enter the domain with a placeholder, because most feeds come from a variant (subdomain) of the main domain. So it is better to enter *.site.de instead of www.site.de in the whitelist, then image feeds, e.g. from bilder.site.de, will also be displayed.v
- If the Internet browser (Chrome, Firefoy, Edge, etc.) is waiting for partial content, it often displays this briefly in the bottom left-hand corner of the browser window when loading the page. Make a note of the exact domains displayed there and also enter them in the whitelist.
- Has the domain perhaps landed incorrectly on the filter list? Then you can ask the JusProg team to check the age classification. To do this, enter the domain here: https://www.jugendschutzprogramm.de/webseite-melden/ The domain will usually be checked and, if necessary, activated within 48 hours.
As of version 9.x, blue screens are a thing of the past (at least they are very rare), we have completely redeveloped the software on the basis of Microsoft’s .NET framework and adapted it to the current Windows10 operating system.
Up to version 8.3.3, there were sometimes blue screens, because Microsoft made changes in Windows 10 with recent updates of the operating system, which lead to blue screens and crashes more frequently in some setups (not in others, the exact behaviour is difficult to understand). These problems could not be solved in the existing JusProg software architecture, so we have gone live with version 9.x, a completely new development on a different technical platform. Blue screens occur especially in interaction with the antivirus programme “avast”; changing the antivirus programme often solves the problem.
However, we have already reacted to this and have put a completely newly developed JusProg Windows version live, so far as a “beta”. We are working flat out to complete this software.
Alternatively, you could always use our Windows software for JusProgDNS: https://www.jusprogdns.com/geraete-einrichtung/windows/ – this has never had a blue screen problem because it works far less deeply in the Windows operating system. We also have a remotely configurable version of this for MDM on request.
If the parental control programme for Windows does not work properly after installation, possibly simply blocks all surfing and there is no tray icon (at the bottom right of the monitor next to the clock), this is usually because – contrary to the recommendation – the anti-virus software was not temporarily deactivated during installation and blocked the installation of part of the JusProg software.
What to do? Temporarily deactivate your virus protection programme. For most programmes, this can be done by clicking with the right mouse button on the virus protection icon (also at the bottom right of the monitor, possibly hidden under an arrow) and selecting the appropriate virus protection software.
Then install the JusProg software again (same version!) so that this time all software parts are installed.
You can now either use the JusProg software or uninstall it in the recommended way (do not just delete anything anywhere!).
Did the installation go wrong (e.g. because the antivirus programme was not temporarily deactivated during installation) and you cannot uninstall the software because you are asked for a parent password that you could not enter in the first place? In this case, please contact our support (via contact form) and state your individual PIN (which you read directly beforehand, the PIN is only temporarily active), which is displayed in the input window for the parent password (from version 9.2.135).
If you link Microsoft Family Safety with Windows user accounts and the JusProg browser extensions, choose the Chrome or Firefox browser, because the Family Safety filtering in Edge cannot be combined with the JusProg extension (no switchable In Private / Incognito mode).
As of version 9.2.135, MS Teams and Zoom can also be used if you have installed the Teams or Zoom software. If you are using an older software version, update the JusProgNET software.